468x60 Ads

Laptop Repair
Mobile Repair
Desktop Repair

Saturday, July 21, 2012

Can't Remove USB Drive


Windows really should tell you what program is using the drive, but it doesn't. You're going to have to do some detective work.

Start by doing what Windows recommends: Wait a bit, then try again. But keep busy while you wait. Make sure you don't have the drive open in Windows Explorer; in fact, you may want to close all of your Windows Explorer windows, just in case. Next, examine the system tray


to make sure that a program that used the drive (or was launched from it) isn't still running in the background.
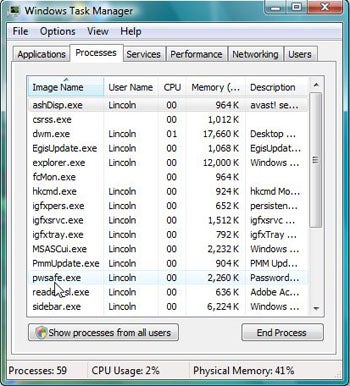
If those tests don't bear fruit, check your running processes: Right-click a blank spot on the taskbar and select Start Task Manager. Click the Processes tab. Examine the list of running processes. If you find a likely culprit, select it, then click the End Process button and confirm your choice.


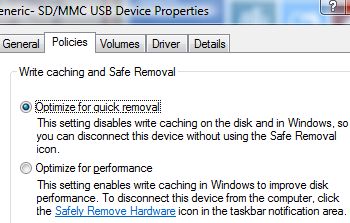
That didn't work, either? Well, you've waited long enough. Let's see if Windows will declare the drive safe to remove.

Nope. You have three options:
The obvious choice is to shut down Windows (and no, hibernating it won't do), remove the drive, then reboot. This is completely safe, and it will work. But it's time-consuming, and requires you to reload all of your programs and files.

The second choice is the foolhardy one: Take a deep breath, then remove the drive despite the warning. I confess: I've done this on numerous occasions, and it has never led to disaster. But I've heard people say that about driving while texting, so you probably shouldn't follow my example.

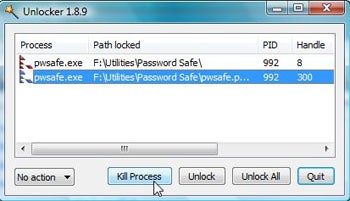
The third and best option is to use third-party software that can identify, and even kill, whatever process is still holding on to something on that drive. Here are two possibilities.
  
USB Safely Remove is the easiest of these two programs. When you install it,
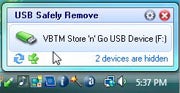
  
it replaces Windows' Safely Remove icon with its own. Click it, and if it can't safely remove the device, it will bring up a dialog box giving you the problem processes. A handy Stop Again button lets you retry the removal. The problem: USB Safely Remove costs $20.

Unlocker, on the other hand, is free. And it also helps you delete files that Windows won't let go of. If Windows says the drive can't be safely removed, right-click it and select Unlocker for a list the problem processes.

Safely Remove USB Drives Just by Unplugging Them


Reader Dane wrote in seeking help with this hassle: "After using Safely Remove Hardware for my SD card, I have to reboot my PC before my PC will recognize another SD card. Is there a way for the PC to accept the card without rebooting?"

This brings to mind the old joke where the guy goes to a doctor and says, "It hurts when I do this," and the doctor says, "So stop doing it."

Dane has the best of intentions: Windows' Safely Remove Hardware (SRH) option stops all read/write activity on a removable drive, thus preventing any data damage when the drive is unplugged.

But note the key word here: drive. When you use SRH on a memory card, you're actually "safely removing" the card reader. That's why Windows refuses to recognize subsequent cards until you reboot (at which point the reader gets re-detected by the system).

The upshot: Stop using SRH for memory cards. Instead, change the settings for the reader so that you can safely remove a card without SRH. Here's how:

1. Right-click the icon for the card reader and choose Properties.
2. Click the Hardware tab.

3. Click the drive name (which may be something like Generic SD/MMC USB Device), and then click the Properties button.

4. Click the Policies tab to reveal your two options: Optimize for quick removal and Optimize for performance. Choose the former, then click OK as needed to exit all the dialogs.

If the two options are grayed out, switch back to the General tab and click the Change settings button to gain administrative rights.


If you don't want to mess with all these settings, just make sure you've closed any program(s) that might be accessing your card, make sure the reader's activity light isn't flashing, and then pull the card. That's how I roll, and in years of card-swapping I've never encountered a problem.

Friday, June 15, 2012

Laptop Service Manual

Introduction


In the same vein as in my driver guide, I’ve started finding laptop service manuals and hosting them on my site. These are the professional, official documents published by the various laptop makers, either for their own technicians or for the use of the general public

They generally detail the exact list of parts in each model of laptop – often down to individual screws, if you happen to have lost some and need to know the exact size for a replacement – and describe the procedure for disassembling and reassembling the entire machine, including panels, RAM, wireless cards, keyboards and touchpads and LCD screens, all the way down to the motherboard itself.

They’re difficult to find – you have to know where to look in their support site, or come up with the right Google search string, or beg and steal from someone you know in the industry. There are blogs and forums that post small numbers of these manuals every now and then; what I hope to achieve here is the most complete repository of laptop disassembly and service manuals available on the internet.

This page, and indeed my whole site, has no ads. I do not charge for downloads. This is not a community-run project where some files turn out to be incomplete, or the plain old user manual you already have, or completely the wrong thing. I do not hide files behind pages designed to confuse and delay you under the guise of providing a difficult service. I do not hotlink manuals on other sites – everything’s hosted in the same place as this page.

Every single file linked from here has been carefully handpicked, verified, sorted and uploaded by myself to make sure this page is as complete and accurate as humanly possible. Basically, click on the model number of your laptop below, and you’ll have all the information you need on how to take it apart.


Practical stuff

Firstly, I do not claim ownership, authority or copyright of anything here on this page. These files, and the information contained therein, is entirely owned by the original publishers, be they Dell, Sony, Acer or anyone else. It’s possible I’m breaking some law or another by distributing these, but I’m going to take the stance that they’re generally difficult to get ahold of without this sort of project, and that everybody – Dell, Sony, Acer et al included – will be better off as a whole for it having been done.

If you happen to be in a position to say I shouldn’t be hosting these files, please consider the spirit of my little project here and think about what your company could do to support and promote the continued use of your own products. You might also consider that there are online businesses that make a profit reselling your copyrighted material who pose a far worse threat than I.

Secondly, I can make no claim as to the completeness or accuracy of these files. That falls back again on the original publishers, who themselves generally use the same disclaimer. What you do with your own property is your own business, and I cannot be held responsible for anything that goes wrong in the course of using one of these service manuals.

Thirdly, my aim here is to distribute knowledge, and that knowledge happens to be the general procedures for in-depth laptop repairs. Actually performing those repairs is something many people, including myself, frequently charge hundreds of dollars for.

If you do need help with this sort of thing, I suggest you enlist the help of your local computer repair shop, but remember it’s frequently not worth the cost to repair old laptops – replacement parts for obsolete gear isn’t cheap, and the hours of labour can stack up for even the simplest-looking jobs.

Check the list of Service Manuals HERE!


Laptop Disassembly Guides

Here are the list of Laptop Disassembly Guides:

You can save the file by downloading it to your computer. Enjoy! I'll be updating this list as possible.


How to disassemble HP Pavilion dm1 laptop


Laptop shuts down without any reason

Clogged laptop heatsink
Does your laptop shut down in the middle of doing something without any reason and warning? Does your laptop run much hotter then before, the keyboard and the bottom part of the laptop feels very hot? If yes, your laptop overheats and has to be cleaned up. It happens because the heat sink is clogged with dust and lint preventing normal air circulation.
These are all the symptoms of a laptop overheating problem in or around the cooling system. The fan and the heat sink have a small gap in between them, this is where dust will be sucked into and will accumulate. Once all the dust and lint is removed, re-assemble your machine. This procedure is something that should be done periodically to ensure that your laptop overheating issues will be a thing of the past.
Alternatively, you can clean up your laptop without taking it apart by blowing off fans and heatsink with compressed air. This is not the best way to fix the problem because some dust will stay inside the laptop but it will work. By the way, if you’ve been using your laptop for a few years, it might be a good idea to replace thermal compound on the processor. It will help to keep your laptop cooler.
Here’s another resource with covers laptop overheating in more depth.

Laptop Overheating Issues:

Does your laptop shutdown at random? Does it slow down during heavy operations? Do you need to wait 10 min. before you can start it up again? These are all the symptoms of a laptop overheating problem in or around the cooling system.

What needs to be remembered is that a lot of the current laptops on the market today are running specifications that traditionally were reserved for desktops. Some even contain desktop CPU’s and a kick ass cooling system to match. Take a look at the cooling modules in some of the current Toshiba notebooks.

Anyhow, in order for these CPU’s to perform they have to be kept as cool as possible so manufacturers like Toshiba, Compaq/HP and the like struggle with the limited space and power to do this, hence they have had some laptop overheating issues.

If your laptop does show some of the symptoms mentioned before here’s what you can do..

On the under side of a lot of the machines you can gain access to the CPU/cooling module compartment, be warned – when tinkering around near the CPU, electro static discharge may be your worst nightmare - be careful to control ESD. Once you have located where the fan is you will be able to see quite clearly if this is your issue.. take a look below.

Laptop Overheating

1: Heat sink
2: Fan

The heat sink runs off to the right of this picture and sits on the CPU, you can see the copper pipe running to the CPU here (1).

The fan and the heat sink have a small gap in between them, this is where dust will be sucked into and will accumulate.


Dust build up inside a Toshiba Satellite A10

You can use a soft paint brush safely enough here to loosen all the dust and then use a vacuum with a brush attachment to remove it. If you're game you can take the fan out (2 screws to remove) and give it a good clean out. This isn’t always so easy, on other models of notebooks the fan or fans are only accessible by removing the main board, not a job for a novice.

Laptop Overheating
Dust build up inside a Toshiba Satellite A10 with the fan removed.

Laptop Overheating
Arrows mark what should be cleaned out before re-assembly.

Once all the dust and lint is removed, re-assemble your machine. This procedure is something that should be done periodically to ensure that your laptop overheating issues will be a thing of the past.


Laptop Repair Tools

The following tools will be very helpful if you decide to repair or disassemble a laptop yourself.
I will make some recommendations and also provide links where you can find all these tools on eBay.


SCREWDRIVER SET


In order to open a laptop case you must have a good set of screwdrivers.
I found that Wiha makes one of the best screwdrivers available on the market today. I’ve been using my Wihas almost every day for over 5 years and they still look like new.
This Wiha 7 Pc Precision Screwdriver Set # 26190 all you need to open any laptop case.

LAPTOP CASE OPEN PRY TOOL


When you disassemble a laptop, very often you have to separate plastic parts.
For example, when you replace the LCD screen, you have to separate the screen bezel from the display cover. Never separate plastic parts with a screwdriver, you can and most likely will damage/scratch the plastic.
I would suggest using laptop/cell phone case open pry tools. These tools are made of plastic and will not damage your laptop.
By the way, you can use a regular guitar pick to open any laptop case. It works very well.

HOOK AND PICK SET


A set of hook and pick tools will be very helpful for routing and unrouting cables inside the laptop case.

SCREW EXTRACTOR SET


A set of screw extractors is very useful when you have to remove a stripped screw.

DIGITAL MULTIMETER


A good digital multimeter will help you test laptop AC adapters. Also, it’s very useful if you decide to fix a failed DC power jack.
Using a multimeter you can test a circuit board or wire for continuity.
I found that Fluke makes one of the most accurate and reliable multimeters available on the market today.
For example, Fluke 15B would be a very good multimeter for most laptop repairs.

SOLDERING STATION


If you would like to repair a failed DC jack, you must have a good soldering station. It has to be powerful enough to melt solder without damaging the circuit board.
I’ve tried many different soldering guns/stations but found that Weller WES51 soldering station does the job very well.

DESOLDERING PUMP


A desoldering pump is another tool you must have for laptop DC jack repairs.
EDSYN SOLDAPULLT Desoldering tool Hand Pump DS017 is a very good one.


Laptop does not start. Is it bad power jack or motherboard?

Let’s say your laptop does not start at all. You plug in the power adapter and press on the power button, but the laptop will not react. It’s dead and the power or battery charge LED will not light up.
What could be wrong? Is it bad power jack or the motherboard is dead?

 
By the way, the power jack aka DC-IN jack is the power socket on the side or back of your laptop where you plug the AC/DC power adapter.
I’ll explain how to perform basic troubleshooting and find out what is wrong. This is only for experienced people, who know how to disassemble laptops.

First of all, test the AC/DC power adapter with a multimeter. It’s very likely that there is noting wrong with the laptop and your problem is related to the power adapter.
If the adapter tests fine and output correct voltage, disassemble the laptop and remove the top cover.
As you see on the first picture, in my laptop the power adapter plugs into the DC-IN power jack which is connected to the motherboard via a harness.
In some models the DC-IN power jack is soldered directly to the motherboard.
Plug in the power adapter and measure voltage at the point where the DC-IN jack or DC harness (like in my case) connected to the motherboard.
If you are reading the same voltage as on the AC adapter, it means the power jack or harness works properly and the problem is related to the motherboard.
If there is no voltage, most likely there is a problem with the jack or hardness and it has to be replaced.


By the way, in some case the problem could be related to the fuse which is usually located somewhere very close to the power jack/harness connector. You can test the fuse with a multimeter.


If the fuse is bad, the motherboard will appear to be dead even if there is nothing wrong with the power jack and AC/DC adapter. If that’s the case, replacing the bad fuse should fix the problem.

Share

Widgets