468x60 Ads

Laptop Repair
Mobile Repair
Desktop Repair

Saturday, July 21, 2012

Can't Remove USB Drive


Windows really should tell you what program is using the drive, but it doesn't. You're going to have to do some detective work.

Start by doing what Windows recommends: Wait a bit, then try again. But keep busy while you wait. Make sure you don't have the drive open in Windows Explorer; in fact, you may want to close all of your Windows Explorer windows, just in case. Next, examine the system tray


to make sure that a program that used the drive (or was launched from it) isn't still running in the background.
If those tests don't bear fruit, check your running processes: Right-click a blank spot on the taskbar and select Start Task Manager. Click the Processes tab. Examine the list of running processes. If you find a likely culprit, select it, then click the End Process button and confirm your choice.


That didn't work, either? Well, you've waited long enough. Let's see if Windows will declare the drive safe to remove.

Nope. You have three options:
The obvious choice is to shut down Windows (and no, hibernating it won't do), remove the drive, then reboot. This is completely safe, and it will work. But it's time-consuming, and requires you to reload all of your programs and files.

The second choice is the foolhardy one: Take a deep breath, then remove the drive despite the warning. I confess: I've done this on numerous occasions, and it has never led to disaster. But I've heard people say that about driving while texting, so you probably shouldn't follow my example.

The third and best option is to use third-party software that can identify, and even kill, whatever process is still holding on to something on that drive. Here are two possibilities.
  
USB Safely Remove is the easiest of these two programs. When you install it,

  
it replaces Windows' Safely Remove icon with its own. Click it, and if it can't safely remove the device, it will bring up a dialog box giving you the problem processes. A handy Stop Again button lets you retry the removal. The problem: USB Safely Remove costs $20.

Unlocker, on the other hand, is free. And it also helps you delete files that Windows won't let go of. If Windows says the drive can't be safely removed, right-click it and select Unlocker for a list the problem processes.

Safely Remove USB Drives Just by Unplugging Them


Reader Dane wrote in seeking help with this hassle: "After using Safely Remove Hardware for my SD card, I have to reboot my PC before my PC will recognize another SD card. Is there a way for the PC to accept the card without rebooting?"

This brings to mind the old joke where the guy goes to a doctor and says, "It hurts when I do this," and the doctor says, "So stop doing it."

Dane has the best of intentions: Windows' Safely Remove Hardware (SRH) option stops all read/write activity on a removable drive, thus preventing any data damage when the drive is unplugged.

But note the key word here: drive. When you use SRH on a memory card, you're actually "safely removing" the card reader. That's why Windows refuses to recognize subsequent cards until you reboot (at which point the reader gets re-detected by the system).

The upshot: Stop using SRH for memory cards. Instead, change the settings for the reader so that you can safely remove a card without SRH. Here's how:

1. Right-click the icon for the card reader and choose Properties.
2. Click the Hardware tab.

3. Click the drive name (which may be something like Generic SD/MMC USB Device), and then click the Properties button.

4. Click the Policies tab to reveal your two options: Optimize for quick removal and Optimize for performance. Choose the former, then click OK as needed to exit all the dialogs.

If the two options are grayed out, switch back to the General tab and click the Change settings button to gain administrative rights.


If you don't want to mess with all these settings, just make sure you've closed any program(s) that might be accessing your card, make sure the reader's activity light isn't flashing, and then pull the card. That's how I roll, and in years of card-swapping I've never encountered a problem.

Friday, June 15, 2012

Laptop Service Manual

Introduction


In the same vein as in my driver guide, I’ve started finding laptop service manuals and hosting them on my site. These are the professional, official documents published by the various laptop makers, either for their own technicians or for the use of the general public

They generally detail the exact list of parts in each model of laptop – often down to individual screws, if you happen to have lost some and need to know the exact size for a replacement – and describe the procedure for disassembling and reassembling the entire machine, including panels, RAM, wireless cards, keyboards and touchpads and LCD screens, all the way down to the motherboard itself.

They’re difficult to find – you have to know where to look in their support site, or come up with the right Google search string, or beg and steal from someone you know in the industry. There are blogs and forums that post small numbers of these manuals every now and then; what I hope to achieve here is the most complete repository of laptop disassembly and service manuals available on the internet.

This page, and indeed my whole site, has no ads. I do not charge for downloads. This is not a community-run project where some files turn out to be incomplete, or the plain old user manual you already have, or completely the wrong thing. I do not hide files behind pages designed to confuse and delay you under the guise of providing a difficult service. I do not hotlink manuals on other sites – everything’s hosted in the same place as this page.

Every single file linked from here has been carefully handpicked, verified, sorted and uploaded by myself to make sure this page is as complete and accurate as humanly possible. Basically, click on the model number of your laptop below, and you’ll have all the information you need on how to take it apart.


Practical stuff

Firstly, I do not claim ownership, authority or copyright of anything here on this page. These files, and the information contained therein, is entirely owned by the original publishers, be they Dell, Sony, Acer or anyone else. It’s possible I’m breaking some law or another by distributing these, but I’m going to take the stance that they’re generally difficult to get ahold of without this sort of project, and that everybody – Dell, Sony, Acer et al included – will be better off as a whole for it having been done.

If you happen to be in a position to say I shouldn’t be hosting these files, please consider the spirit of my little project here and think about what your company could do to support and promote the continued use of your own products. You might also consider that there are online businesses that make a profit reselling your copyrighted material who pose a far worse threat than I.

Secondly, I can make no claim as to the completeness or accuracy of these files. That falls back again on the original publishers, who themselves generally use the same disclaimer. What you do with your own property is your own business, and I cannot be held responsible for anything that goes wrong in the course of using one of these service manuals.

Thirdly, my aim here is to distribute knowledge, and that knowledge happens to be the general procedures for in-depth laptop repairs. Actually performing those repairs is something many people, including myself, frequently charge hundreds of dollars for.

If you do need help with this sort of thing, I suggest you enlist the help of your local computer repair shop, but remember it’s frequently not worth the cost to repair old laptops – replacement parts for obsolete gear isn’t cheap, and the hours of labour can stack up for even the simplest-looking jobs.

Check the list of Service Manuals HERE!


Laptop Disassembly Guides

Here are the list of Laptop Disassembly Guides:

You can save the file by downloading it to your computer. Enjoy! I'll be updating this list as possible.


How to disassemble HP Pavilion dm1 laptop


Laptop shuts down without any reason

Clogged laptop heatsink
Does your laptop shut down in the middle of doing something without any reason and warning? Does your laptop run much hotter then before, the keyboard and the bottom part of the laptop feels very hot? If yes, your laptop overheats and has to be cleaned up. It happens because the heat sink is clogged with dust and lint preventing normal air circulation.
These are all the symptoms of a laptop overheating problem in or around the cooling system. The fan and the heat sink have a small gap in between them, this is where dust will be sucked into and will accumulate. Once all the dust and lint is removed, re-assemble your machine. This procedure is something that should be done periodically to ensure that your laptop overheating issues will be a thing of the past.
Alternatively, you can clean up your laptop without taking it apart by blowing off fans and heatsink with compressed air. This is not the best way to fix the problem because some dust will stay inside the laptop but it will work. By the way, if you’ve been using your laptop for a few years, it might be a good idea to replace thermal compound on the processor. It will help to keep your laptop cooler.
Here’s another resource with covers laptop overheating in more depth.

Laptop Overheating Issues:

Does your laptop shutdown at random? Does it slow down during heavy operations? Do you need to wait 10 min. before you can start it up again? These are all the symptoms of a laptop overheating problem in or around the cooling system.

What needs to be remembered is that a lot of the current laptops on the market today are running specifications that traditionally were reserved for desktops. Some even contain desktop CPU’s and a kick ass cooling system to match. Take a look at the cooling modules in some of the current Toshiba notebooks.

Anyhow, in order for these CPU’s to perform they have to be kept as cool as possible so manufacturers like Toshiba, Compaq/HP and the like struggle with the limited space and power to do this, hence they have had some laptop overheating issues.

If your laptop does show some of the symptoms mentioned before here’s what you can do..

On the under side of a lot of the machines you can gain access to the CPU/cooling module compartment, be warned – when tinkering around near the CPU, electro static discharge may be your worst nightmare - be careful to control ESD. Once you have located where the fan is you will be able to see quite clearly if this is your issue.. take a look below.

Laptop Overheating

1: Heat sink
2: Fan

The heat sink runs off to the right of this picture and sits on the CPU, you can see the copper pipe running to the CPU here (1).

The fan and the heat sink have a small gap in between them, this is where dust will be sucked into and will accumulate.


Dust build up inside a Toshiba Satellite A10

You can use a soft paint brush safely enough here to loosen all the dust and then use a vacuum with a brush attachment to remove it. If you're game you can take the fan out (2 screws to remove) and give it a good clean out. This isn’t always so easy, on other models of notebooks the fan or fans are only accessible by removing the main board, not a job for a novice.

Laptop Overheating
Dust build up inside a Toshiba Satellite A10 with the fan removed.

Laptop Overheating
Arrows mark what should be cleaned out before re-assembly.

Once all the dust and lint is removed, re-assemble your machine. This procedure is something that should be done periodically to ensure that your laptop overheating issues will be a thing of the past.


Laptop Repair Tools

The following tools will be very helpful if you decide to repair or disassemble a laptop yourself.
I will make some recommendations and also provide links where you can find all these tools on eBay.


SCREWDRIVER SET


In order to open a laptop case you must have a good set of screwdrivers.
I found that Wiha makes one of the best screwdrivers available on the market today. I’ve been using my Wihas almost every day for over 5 years and they still look like new.
This Wiha 7 Pc Precision Screwdriver Set # 26190 all you need to open any laptop case.

LAPTOP CASE OPEN PRY TOOL


When you disassemble a laptop, very often you have to separate plastic parts.
For example, when you replace the LCD screen, you have to separate the screen bezel from the display cover. Never separate plastic parts with a screwdriver, you can and most likely will damage/scratch the plastic.
I would suggest using laptop/cell phone case open pry tools. These tools are made of plastic and will not damage your laptop.
By the way, you can use a regular guitar pick to open any laptop case. It works very well.

HOOK AND PICK SET


A set of hook and pick tools will be very helpful for routing and unrouting cables inside the laptop case.

SCREW EXTRACTOR SET


A set of screw extractors is very useful when you have to remove a stripped screw.

DIGITAL MULTIMETER


A good digital multimeter will help you test laptop AC adapters. Also, it’s very useful if you decide to fix a failed DC power jack.
Using a multimeter you can test a circuit board or wire for continuity.
I found that Fluke makes one of the most accurate and reliable multimeters available on the market today.
For example, Fluke 15B would be a very good multimeter for most laptop repairs.

SOLDERING STATION


If you would like to repair a failed DC jack, you must have a good soldering station. It has to be powerful enough to melt solder without damaging the circuit board.
I’ve tried many different soldering guns/stations but found that Weller WES51 soldering station does the job very well.

DESOLDERING PUMP


A desoldering pump is another tool you must have for laptop DC jack repairs.
EDSYN SOLDAPULLT Desoldering tool Hand Pump DS017 is a very good one.


Laptop does not start. Is it bad power jack or motherboard?

Let’s say your laptop does not start at all. You plug in the power adapter and press on the power button, but the laptop will not react. It’s dead and the power or battery charge LED will not light up.
What could be wrong? Is it bad power jack or the motherboard is dead?

 
By the way, the power jack aka DC-IN jack is the power socket on the side or back of your laptop where you plug the AC/DC power adapter.
I’ll explain how to perform basic troubleshooting and find out what is wrong. This is only for experienced people, who know how to disassemble laptops.

First of all, test the AC/DC power adapter with a multimeter. It’s very likely that there is noting wrong with the laptop and your problem is related to the power adapter.
If the adapter tests fine and output correct voltage, disassemble the laptop and remove the top cover.
As you see on the first picture, in my laptop the power adapter plugs into the DC-IN power jack which is connected to the motherboard via a harness.
In some models the DC-IN power jack is soldered directly to the motherboard.
Plug in the power adapter and measure voltage at the point where the DC-IN jack or DC harness (like in my case) connected to the motherboard.
If you are reading the same voltage as on the AC adapter, it means the power jack or harness works properly and the problem is related to the motherboard.
If there is no voltage, most likely there is a problem with the jack or hardness and it has to be replaced.


By the way, in some case the problem could be related to the fuse which is usually located somewhere very close to the power jack/harness connector. You can test the fuse with a multimeter.


If the fuse is bad, the motherboard will appear to be dead even if there is nothing wrong with the power jack and AC/DC adapter. If that’s the case, replacing the bad fuse should fix the problem.

How to test laptop screen inverter with a multimeter

Is it possible to test laptop screen inverters with a regular multimeter? I was asking myself exactly the same question many times before until I found this article published by Morris Rosenthal. Apparently, you can test inverters with a multimeter but you have to have the right one, with frequency rated at least 50KHz.
my $20 meter failed to register anything! So I borrowed a better meter from my neighbor, a Fluke 110 true RMS meter. The Fluke specs show it’s rated to 50KHz, which turned out to be critical in the inverter test application.
I’m not sure how accurate this test is, so I will probably find a Fluke multimeter and try it myself. If this test works 100%, it will be very helpful to me.
By the way, some of you may ask what a screen inverter is and where it’s located inside a laptop? I’ll try to answer in a few words. The inverter board is a power supply for the LCD screen and it powers up the backlight lamp (CCFL) inside the LCD screen. When inverter fails, the LCD screen remains dark even after your turn on the laptop. You still can use the laptop with an external monitor attached to the VGA port but not with the internal screen. The image on the laptop screen will be very dark, almost invisible. The inverter board is located inside the display panel and in most laptops you’ll find the inverter board located right below the LCD screen.
The image below explains how the inverter board is connected to other components inside your laptop.

Here’s how you can test the inverter board using a spare backlight lamp.


Basically, you unplug the LCD screen from the inverter and plug in a known good backlight instead. If your test backlight lamp doesn’t light up, most likely there is a problem with the inverter board.
If you plat to test more than one LCD screen, you mgith consider buying this CCFL bulb and inverter tester designed by LCDParts.net. You can find this tester here.
Finally we have the LCD Screen Tester available (LST01 is including a 12V DC Adapter) after months of experiment with many different types of LCD screens. No more guess works! This custom built equipment can help you isolate problem between CCFL Backlight Lamp and Inverter in seconds.


How To's

Computer Repair Safety Precautions!

Electrical Hazards

UNPLUG THE COMPUTER and wait a few minutes before opening the computer and keep it unplugged at any time you are working on the hardware! This will ensure that the capacitors are empty or only partially charged avoiding electrical shocks that can damage your computer
electrical safety
Ensure that the power outlets are properly grounded and that all equipment electrical wires are in good condition and provide proper grounding to avoid charge build up. 

Avoid wearing loose jewelry or other conductive objects, such as rings and watches with metal bands, whenever you work around electrical equipment. 

The energy stored in a monitor or computer power supply is high enough to be dangerous. Even when the electricity is disconnected, capacitors in the monitor and power supply can hold a harmful amount of electrical charge.

Never open a power supply case or monitor unless you’re experienced working with electricity.
Touch a large piece of metal to Ground yourself! Your computer is very sensitive to static electricity, and you could burn it if you do not follow this step!

Hardware repair or replacement manipulation. 


Repairing your computer is rather easy when you know what you are doing. By that I mean you don't need any other tool than a screw driver and the parts are easy to reach and manipulate (compare to repairing a car).

The hardware itself cannot be repaired if burnt. With the exception of the Power Supply and hard Drive, I would be very careful changing the parts if burnt. If anything else is damaged in your computer, you risk burning the new part. 

I say that from experience. I burnt a New Mother Board once by installing damaged RAM on it, to test the RAM. Instead try to replace the part with a cheap old/used part to see if everything works properly before replacing the part with a high performance new part.

Always put safety first even when repairing your computer!

Computer Repair Flowchart


Common Problems With a PC


PCs are the most common type of computer in the world. PCs can run a number of different operating systems, ranging from Microsoft Windows to Unix and Linux. Regardless of the operating system running on the computer, a number of common problems can occur with PC hardware. Understanding those problems can help with troubleshooting and repair.

Memory Problems
The most common problem experienced by PCs is inadequate random access memory (RAM). If your computer doesn't have enough RAM, it forces the hard disk to act as short-term storage for program execution. Because the hard disk is slower than RAM, it causes your overall computing experience to be slow and sluggish.

CPU Problems
Older CPUs may not be able to perform calculations fast enough for more modern operating systems and software. CPU power grows quickly, and after a number of years, newer software may simply outstrip an older CPU's ability to perform calculations to run the program. A good example of this is modern multiple-core CPUs. Multiple-core CPUs actually contain two or more CPUs in one package. CPUs that are a generation or two old only have a single core, or single CPU.

Hard Disk Failure
Hard disks are complex mechanical systems where components operate with very little margin for error. As a hard disk ages, components can wear out, causing mechanical failure. Some older computers cannot address the full range of newer high-capacity hard drives. As a result, some newer high-capacity hard drives may not work in older computers.

CD/DVD Drive Issues
CD and DVD drives use lasers to read data from the reflective portion of a CD or DVD. Over time, CD and DVD drive lasers can become misaligned. Because CD and DVD drives are mechanical, parts of the drive can fail over time. This is usually indicated by clicking or grinding noises when the computer tries to access the drive.

Power Supply Problems
The power supply in your PC is responsible for providing stable power to your computer's components. A power supply that is too small can cause problems with overheating, reboots and computer lockups. As a power supply ages, the voltages it provides to system components may begin to vary, causing similar symptoms to a power supply that is too small. A power supply that is failing or is too small can also cause problems, including failure, in other computer components.

Additional Reading:
https://docs.google.com/document/d/1HwMGH_6k_9oVo1-39kD-hfmidl_od4b0FdvKvz6_8z8/edit


Monday, June 11, 2012

How To Fix a Blue Screen of Death


A Blue Screen of Death, also called a STOP Error, will appear when an issue is so serious that Windows must stop completely.

A Blue Screen of Death is usually hardware or driver related. Most BSODs show a STOP code that can be used to help figure out the root cause of the Blue Screen of Death.


Did your PC restart after the BSOD? If the blue screen flashed and your computer rebooted automatically before you had time to read anything, see Tip #3 at the bottom of the page.


Important: Below are general Blue Screen of Death troubleshooting steps.


Note: Some of these steps may require you to start Windows in Safe Mode. If that's not possible then skip those steps.

Difficulty: Average

Time Required: It might take you several hours to fix a Blue Screen of Death, depending on the STOP Code.

Here's How:

1. The most important Blue Screen of Death troubleshooting step you can take is to ask yourself what you just did.

Did you just install a new program or a piece of hardware, update a driver, install an update, etc.? If so, there's a very good chance that the change you made caused the BSOD. Undo the change you made and test again for the STOP Error. Depending on what change you made, some solutions might include:
- Startup using Last Known Good Configuration to undo recent registry and driver changes
- Use System Restore to undo recent system changes.
- Roll Back device driver to version prior to your driver update.

2. Verify that a minimum amount of free space is available on your Windows partition. Blue Screens of Death and other serious issues, like data corruption, can occur if there's not enough free space on your primary partition used for the Windows operating system.

Note: Microsoft recommends that you maintain at least 100MB of free space but I regularly see problems with free space that low. I usually advise Windows users to keep at least 15% of a drive's capacity free at all times.

3. Scan your computer for viruses. Some viruses can cause a Blue Screen of Death, especially ones that infect the master boot record (MBR) or boot sector.

Important: Make sure your virus scanning software is completely up to date and that it's configured to scan the MBR and boot sector.

4. Apply all available Windows service packs and other updates. Microsoft regularly releases patches and service packs for their operating systems that may contain fixes for the cause of your BSOD.

5. Update drivers for your hardware. Most Blue Screens of Death are hardware or driver related so updated drivers could fix the cause of the STOP error.

6. Check the System and Application logs in Event Viewer (7/Vista | XP) for errors or warnings that might provide more clues on the cause of the BSOD.

7. Return hardware settings to default in Device Manager. Unless you have a specific reason to do so, the system resources that an individual piece of hardware is configured to use in Device Manager should be set to default. Non-default hardware settings have been known to cause a Blue Screen of Death.

8. Return BIOS settings to their default levels. An overclocked or misconfigured BIOS can cause all sorts of random issues, including BSODs.

Note: If you've made several customizations to your BIOS settings and don't wish to load the default ones then at least try returning clock speed, voltage settings, and BIOS memory options to their default settings and see if that fixes the STOP error.

9. Make sure all internal cables, cards, and other components are installed and seated properly. Hardware that's not firmly in place can cause a Blue Screen of Death so try reseating the following and then test for the STOP message again:

- Reseat all internal data and power cables
- Reseat the memory modules
- Reseat any expansion cards

10. Perform diagnostic tests on all hardware you're able to test. It's highly likely that the root cause of any given Blue Screen of Death is a failing piece of hardware:

- Test your system memory
- Test your hard disk drive

If a test fails, replace the memory or replace the hard drive as soon as possible.

11. Update your BIOS. In some situations, and outdated BIOS could cause a Blue Screen of Death due to certain incompatibilities.

12. Start your PC with essential hardware only. A useful troubleshooting step in many situations, including BSOD issues, is to start your computer with the minimum hardware necessary to run the operating system. If your computer starts successfully it proves that one of the removed hardware devices was the cause of the STOP message.

Tip: Typically, the only necessary hardware for starting your PC through to the operating system includes the motherboard, CPU, RAM, primary hard drive, keyboard, video card, and monitor.

Tips:Find that hardware is the cause of your Blue Screen of Death?

Try this:
- Replace the hardware.
- Update the hardware's firmware.
- Make sure the hardware is on the Hardware Compatibility List.
- Check with the manufacturer for support information.

Find that a software program is the cause of your Blue Screen of Death?
Try this:
- Reinstall the software.
- Check for and install any available program updates.
- Check with the developer for support information.
- Try a competing program.

Is your PC restarting before you can read the STOP Code on the Blue Screen of Death?

Most Windows PCs are configured to reboot immediately after receiving a serious error like a BSOD. You can prevent this reboot by disabling the automatic restart on system failure option.

How To Troubleshoot Stopping, Freezing, or Reboot Issues During Windows Startup


One particularly frustrating way in which your computer might not start is when you encounter an issue during the Windows startup process but have nothing to go on - no Blue Screen of Death or other error message.

Your computer might freeze on the Windows splash screen, in which case you'll have to restart it manually, only to freeze at the same place again. Or maybe your computer restarts automatically sometime after Windows begins to load, causing what's called a "reboot loop."

Sometimes your computer might even stop at a point where you can move your mouse around but nothing happens. Windows might seem like it's still trying to start but eventually you have to manually reboot your computer, only to see the same behavior again!

Note: If you see a blue screen full of information flash on the screen before your computer reboots, this is a Blue Screen of Death and your computer happens to be configured to reboot after one. See How To Troubleshoot Windows STOP Errors instead of this guide.
Important: If your PC is in fact booting to the Windows login screen, you see any kind of error message, or if you're not even getting past the POST.

Difficulty: Average

Time Required: Anywhere from minutes to hours depending on why Windows isn't starting correctly

Here's How: 

1. Restart your computer if you haven't already done so at least once since seeing this problem.
Many things go on in the background when Windows is starting up. Sometimes things don't work exactly as they should, especially after Windows has installed updates or there were other major changes to the operating system the last time it was up and running. A restart might be all Windows needs to get back on track.
  
2. Repair your Windows installation. A common reason for Windows to freeze up or reboot automatically during the Windows startup process is because one or more important Windows files are damaged or missing. Repairing Windows replaces these important files without removing or changing anything else on your computer.

Note: In Windows 7 and Vista, this is called a Startup Repair. In Windows XP it's referred to as a Repair Installation.

Important: The Windows XP Repair Installation is more complicated and has more drawbacks than the Startup Repair available in the other operating systems. So, if you're an XP user, you may want to wait until you've tried Steps 3 through 6 before giving this a try.

3. Start Windows using Last Known Good Configuration. If you've just made a change to your computer that you suspect might have caused Windows to stop booting properly, starting with the Last Known Good Configuration could help.
Last Known Good Configuration will return many important settings to the states they were in the last time Windows started successfully, hopefully solving this problem and allowing you back in to Windows.

4. Start Windows in Safe Mode and then use System Restore to undo recent changes. Windows could freeze, stop, or reboot during the startup process because of damage to a driver, important file, or part of the registry. A System Restore will return all of those things to their last working order which could solve your problem entirely.

Note: Depending on the reason that Windows isn't starting, you might not even be able to enter Safe Mode. Luckily, you can also perform a System Restore from System Recovery Options which is available from the Advanced Boot Options menu in Windows 7 and also from your Windows 7 or Windows Vista Setup DVD.

Important: Please know that you will not be able to undo a System Restore if it's done from Safe Mode or from System Recovery Options. You might not care since you can't start Windows normally anyway, but it's something I wanted you to be aware of.

5. Scan your computer for viruses, again from Safe Mode.

A virus or other kind of malware might have caused a serious enough problem with a part of Windows to cause it to stop starting properly.

6. Clear the CMOS. Clearing the BIOS memory on your motherboard will return the BIOS settings to their factory default levels. A BIOS misconfiguration could be the reason that Windows is freezing during startup.

Important: If clearing the CMOS does fix your Windows startup problem, make sure future changes in BIOS are completed one at a time so if the problem returns, you'll know which change caused the problem.

7. Replace the CMOS battery if your computer is more than three years old or if it's been off for an extended amount of time.

CMOS batteries are very inexpensive and one that is no longer keeping a charge can certainly be the cause of Windows freezing, stopping, or rebooting during startup.
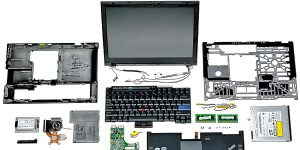
8. Reseat everything you can get your hands on. Reseating will reestablish the various connections inside your computer and is very often a "magic" fix to startup problems like this, especially reboot loops and freezes.

Try reseating the following hardware and then see if Windows will boot properly:
  • Reseat all internal data and power cables
  • Reseat the memory modules
  • Reseat any expansion cards
Note: Unplug and reattach your keyboard, mouse, and other external devices as well.

9. Check for causes of electrical shorts inside your computer. An electrical short is often the cause of reboot loops and hard freezes while Windows is starting.

10. Test the RAM. If one of your computer's RAM modules fails completely, your computer won't even turn on. Most of the time, however, memory fails slowly and will work up to a point.
If your system memory is failing, your computer may power on but then freeze, stop, or reboot continuously at some point during Windows startup.

Replace the memory in your computer if the memory test shows any kind of problem.
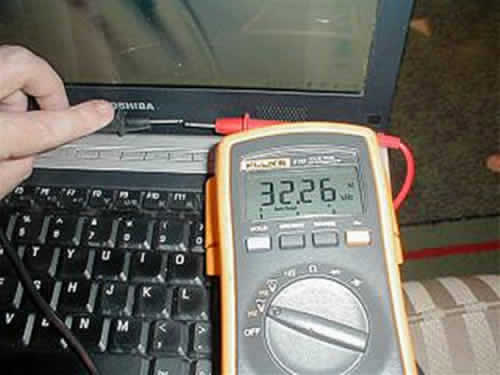
11. Test the power supply. Just because your computer initially turns on does not mean that the power supply is working. While it might not be common for your computer to get all the way to the Windows startup process with a damaged power supply, it does happen and is worth a look.
Replace your power supply if your tests show a problem with it.

12. Replace the hard drive's data cable. If the cable that connects the hard drive to the motherboard is damaged or not working then you could see all kinds of issues while Windows is loading - including freezing, stopping, and reboot loops.

Don't have a spare hard drive data cable? You can pick one up at any electronics store or you could borrow the one that another drive, like your optical drive, is using, assuming of course that's it's the same type of cable. Newer drives use SATA cables and older drives use PATA cables.

Note: A loose hard drive data cable can cause the same issues that a damaged one can but hopefully you checked for connection issues with the cable back in Step 8.

Important: Make sure you've tried your best to complete the troubleshooting steps up to this one. Steps 13 and 14 both involve more difficult and destructive solutions to freezing, stopping, and continuous reboot problems during Windows startup. It may be that one of the below solutions is necessary to fix your problem but if you haven't been diligent in your troubleshooting up to this point, you can't know for sure that one of the easier solutions above isn't the right one.

13. Test the hard drive. A physical problem with your hard drive is certainly a reason why Windows might reboot continuously, freeze completely, or stop in its tracks. A hard drive that can't read and write information properly certainly can't load an operating system properly.
Replace your hard drive if your tests show an issue. After replacing the hard drive, you'll need to perform a new installation of Windows.

If your hard drive passes your test, the hard drive is physically fine so the cause of the problem must be with Windows, in which case the next step will solve the problem.
  
14. Perform a Clean Install of Windows. This type of installation will completely erase the drive and install Windows again from scratch.

Important: In Step 2, I advised that you try to solve Windows-caused startup issues by repairing Windows. Since that method of fixing important Windows files is non-destructive, make certain that you've tried that before the completely destructive, last-resort clean install in this step.


Computer turns off without warning

Question

Computer turns off without warning.

Cause

This issue could be caused by any of the below possibilities.
  1. Heat related issue.
  2. Hardware issue or error.
  3. Computer virus.
  4. Issue with operating system.
  5. Other failing hardware

Answer

Tip: This document is for computers that remain off and not computer's that turn back on (restart).
Caution: Some of the below steps require you open your computer. While in the computer, be cautious of ESD.

Heat related issue
A computer that turns off without warning is often a heat related issue. Many computers today are designed to turn off or automatically reboot if the computer, processor, or other device in your computer gets too hot. If you have heard any abnormal noises coming from your computer recently such as a high squealing, this could indicate a fan may be failing in your computer.

You can first start by verifying the fan on the power supply is working by examining the back of the computer and seeing if the fan is moving and moving smoothly. For all other fans in the computer, you will need to either open the computer and make sure the fan are working (processor fan and case fans) and if your BIOS monitors the RPM of the fans, enter BIOS and make sure the BIOS does not report any errors.
While inside the computer it's also a good idea to verify the processor heatsink is properly connected by disconnecting and reconnecting the heatsink. If the processor heatsink is not properly attached to the processor the computer to overheat.

Hardware issue or error
Any failing hardware component in your computer could cause your computer to unexpectedly turn off without warning. If you have recently attempted to add a new hardware device, remove that device to make sure it is not causing your issues.

Before attempting to remove any hardware, make sure you are not encountering this issue because of hardware conflicts by checking Device Manager for errors.

If you have not recently installed any new hardware into the computer, the next best solution to determining if this is a hardware issue would be remove any hardware on the computer that is not needed. For example, remove your modem, network card, sound card, and any other expansion cards that are not needed for the computer to operate. Run the computer without these cards to see if they are the cause of your issue.

Computer virus
It's possible for your computer to be infected with a virus that is designed to shut down your computer or turn it off. If your computer seems to be turning off when executing a certain program at specific times in the day, it could be infected.

If you believe your computer may be infected with a virus or are uncertain if your computer is infected with a virus, make sure your virus scanner definitions are up-to-date.

Issue with operating system
If after following each of the above recommendations your computer still continues to reboot, it is likely that you are experiencing a Microsoft Windows operating system related issue that cannot be explained. To help make sure this is the case, try the below steps.
  1. Reboot the computer and enter CMOS setup as the computer is booting.
  2. After you have loaded the computer in CMOS setup, let the computer sit.
If the computer does not turn off while letting the computer sit in CMOS, it is likely that you are in fact experiencing an issue with Microsoft Windows or your operating system and it is recommend that if you have followed all of the above recommendations that you erase everything and reinstall Microsoft Windows.

Other failing hardware
If after reinstalling your operating system, or during the installation of your operating system, your computer turns off abnormally, it is very likely that other hardware is failing in the computer. Often this is RAM, CPU, Motherboard, and Power Supply (in that order).

If you have extra available parts or have a friend or co-worker with a similar configuration that is willing to allow you to test their hardware in your computer, try swapping these parts to determine if they are at fault. Otherwise, you will need to have the computer serviced.

How to repair and revive Hard Disk Drives (HDD)

Loosing precious data due to hard disk failure is something that everyone never wanted to happen. That is why, we need, you need to constantly have a fresh backup of those precious data. But, in some cases where you were unable to perform backup and the drive gone bad, fear not, for you can still repair and revive your drive and perform data recovery before your drive would be totally unusable.
One software that i have been using for quite sometime now and never failed me so far is the HDD (Hard Disk Drives) Regenerator. This great software can do the following.
  • Detect physical bad sectors on a hard disk drive surface
  • Repair physical bad sectors (magnetic errors) on a hard disk drive’s surface
  • It works with any file systems including NTFS and FAT, also with unformatted and unpartitioned hard disk drives
  • Supports bootable regenerating floppy and cd to automatically start the regenerating process


I always use this software as the last resort for reviving my hard disk drives. regeneration takes a whole night for a 40gb drive, depends on the drive capacity that you are regenerating.
You can download the demo version of the software here.

How To Perform a Startup Repair in Windows 7


The Startup Repair tool repairs Windows 7 by replacing important operating system files that might be damaged or missing. Startup Repair is an easy diagnostic and repair tool to use when Windows 7 fails to start properly. To begin the Windows 7 Startup Repair process, you will need to boot from the Windows 7 DVD. Watch for a Press any key to boot from CD or DVD... message similar to the one shown in the screenshot above.

Press a key to force the computer to boot from the Windows 7 DVD. If you do not press a key, your PC will try to boot to the operating system that's currently installed on your hard drive. If this happens, just restart your computer and try to boot to the Windows 7 DVD again. Note: Not using Windows 7? Every modern Windows operating system has a similar operating system file repair process.

No user intervention is required here. Just wait for the Windows 7 setup process to load files in preparation for whatever task you might want to complete. In our case it's a Startup Repair but there are a lot of tasks that could be completed with the Windows 7 DVD.

Note: No changes are being made to your computer during this step. Windows 7 is only temporarily "loading files."


Choose the Language to install, Time and currency format, and Keyboard or input method that you'd like to use in Windows 7.

Click Next.

Click on the Repair your computer link on the bottom-left of the Install Windows window.

This link will begin the Windows 7 System Recovery Options which contains several useful diagnostic and repair tools, one of which is Startup Repair.

Note: Do not click on Install now. If you already have Windows 7 installed, this option is used to perform a Clean Install of Windows 7 or a Parallel Install of Windows 7.


System Recovery Options, the set of tools that contains Startup Repair, will now search your hard drive(s) for any Windows 7 installations.

You don't need to do anything here but wait. This Windows installation search shouldn't take more than a few minutes at most.


Choose the Windows 7 installation that you'd like to perform the Startup Repair on.

Click the Next button.

Note: Don't worry if the drive letter in the Location column does not match the drive letter that you know Windows 7 is installed on in your PC. Drive letters are somewhat dynamic, especially when using diagnostic tools like System Recovery Options.

For example, as you can see above, my Windows 7 installation is listed as being on drive D: when I know that it's actually the C: drive when Windows 7 is running.


Click on the Startup Repair link from list of recovery tools in System Recovery Options.

As you can see, several other diagnostic and recovery tools are available in the Windows 7 System Recovery Options including System Restore, System Image Recovery, Windows Memory Diagnostic, and Command Prompt.

In this guide, however, we're only repairing operating system files using the Startup Repair tool.


The Startup Repair tool will now search for problems with important Windows 7 files.

If Startup Repair finds a problem with an important operating system file, the tool may suggest a solution of some kind that you have to confirm or may solve the problem automatically. Whatever happens, follow the prompts as necessary and accept any changes suggested by Startup Repair.

Important Note:
If you want the Startup Repair to work properly, you must remove any flash drives or other USB storage devices, like external hard drives, from your computer before running the tool. Due to the way some computers report the storage space on USB connected drives, the Windows 7 Startup Repair may incorrectly report that it found no problems when in fact there may actually be an issue.

If you've already started, or completed, the Startup Repair and you realize that you have a USB storage device connected, just remove it and restart these instructions at Step 1.


Startup Repair will now attempt to repair whatever problems it found with Windows 7 files. No user intervention is required during this step.

Important:
Your computer may or may not restart several times during this repair process. Do not boot from the Windows 7 DVD on any restart. If you do, you'll need to restart immediately so the Startup Repair process can continue normally.

Note: If Startup Repair did not find any problem with Windows 7, you won't see this step.

Click the Finish button once you see the Restart your computer to complete the repairs window to restart your PC and start Windows 7 normally.
Important: It's possible that Startup Repair didn't fix whatever problem you were having. If the Startup Repair tool determines this itself, it may automatically run again after your computer restarts. If it does not automatically run but you're still seeing problems with Windows 7, repeat these steps to run Startup Repair again manually.
Also, be sure to read the Important Note on Step 8.
If it becomes apparent that Startup Repair is not going to solve your Windows 7 problem, you do have some additional recovery options including a System Restore or a System Image Recovery, assuming you have previously backed up your entire computer.
You could also try a Parallel Install of Windows 7 or a Clean Install of Windows 7.
However, if you've tried a Startup Repair of Windows 7 as part of another troubleshooting guide, you're probably best served by continuing with whatever specific advice that guide is giving as your next step.

Share

Widgets