468x60 Ads

Laptop Repair
Mobile Repair
Desktop Repair

Sunday, June 10, 2012

How-to POST Test a Motherboard – POWER ON SELF TEST Guide


Motherboard POST Information – Troubleshooting and Diagnostic

To perform a POST TEST (Power On Self Test) on a motherboard you need four pieces of hardware.
  • The Motherboard
  • A CPU (Processor)
  • Memory (RAM)
  • A Power Supply
Depending on whether your motherboard has onboard video or not you may also need a Video Card for the POST Test.

01. A Good Motherboard Testing Area


Place your Motherboard on a non-conductive surface. A foam pad works great. Otherwise use the antistatic bag, or box the motherboard came in for a testing surface. (Make sure no metal is touching the motherboard or it may short out.)

02. Install the System Memory (RAM)


Install your memory onto your motherboard. Check the notch in the bottom of your memory to make sure it is oriented the correct way when you install it into your motherboard.
When you insert the RAM into the memory slots on the motherboard you should feel two tabs on each end of the memory socket snap into place. Check to make sure your RAM is seated level in the memory socket.

If it is not seated properly you will need to remove the memory and reinstall it. In the picture above you can see the tab has not locked the memory in place and the memory is not seated correctly. The tab should remain flush with the others once the memory has been installed properly.

03. Mounting Your CPU (Processor)


Next you will need to install your processor. All CPU sockets have a lever that needs to be opened to install the CPU. Make sure this lever is open so you can get the processor into the CPU Socket.
Picture #1 shows an Intel CPU Socket with the lever closed.
Picture #2 shows an AMD CPU Socket with the lever closed.


Before placing your processor in the CPU Socket check for an alignment indicator on the CPU.
Picture #1 – On Intel Processors there are two (2) notches on the bottom of the CPU that will line up with 2 notches on the CPU Socket.
Picture #2 – On AMD Processors this will be a small arrow marked on one corner of the CPU that aligns with a mark on the CPU Socket.
Make sure to note these indicators and double check that your CPU is aligned the correct way when you place it into the CPU Socket. This will help you avoid bent pins that may damage the CPU.

Once the Processor is installed securely in the CPU Socket you will need to close the socket and secure the lever on the CPU Socket. This will lock the CPU in place.
Once you have closed the lever on the CPU Socket you will need to install your CPU Heat Sync.
Picture #1 – Shows an Intel Processor mounted in the CPU Socket. The lever is closed locking the CPU in place.
Picture #2 – Shows an AMD Processor mounted in the CPU Socket. The lever is closed locking the CPU in place.

04. Installing the CPU Heat Sync (Cooler)


All retail box CPUs come with a CPU Heat Sync. You should have received one in the box when you purchased your CPU.
(Make sure to remove the plastic cooler on the bottom of the heat sync if it has one. DO NOT remove the grey square or circle on the bottom of the heat sync. This is known as the “heat patch” and is needed for the cooler to function properly.

05. Hookup the Power Supply to the Motherboard

Most Power Supply (PSU) units require two connections to the motherboard to provide power for a POST Test.

The first connection is the 20/24 pin ATX power connection. This will go into the 20/24 pin white connection on your motherboard. This is usually located near your memory sockets.
This connection is “keyed” meaning it will only fit one way. Align the notch on the 20/24 power cable with the tab on the 20/24 pin power socket. When you insert the connection you should feel a small click as the tab latches in place.

Now you need to plug in the 4 pin ATX power connection. This is usually located between your CPU and your IO ports.
This connection is also “keyed” so it will only fit into the socket one way. Once again align the notch on the cable with the tab on the socket and you should have trouble getting it to snap into place.

06. Installing a Video Card (Or not)

If you have an all in one motherboard you are ready to perform the motherboard POST test. Simply hookup your VGA (Monitor) connection and your PS2 Keyboard and Mouse connections.

If you do not have a spot to connect your monitor (VGA) cable then you probably need to install a video card.
Installation of the video card is very straight forward. You simply need to insert your video card into your PCI express socket (or AGP depending on how old the motherboard us.) You should feel the card snap into place.
Some cards do not feel like they lock in when they are inserted into the motherboard. If this is the case check the socket where the video card plugs into the motherboard and make sure it looks level.

Some video card slots have a tab, or notch on the side closet to your memory that is designed to lock the card into place. Check this tab and make sure it is latching properly if you are having trouble getting your video card installed.

07. Hooking Up Your Keyboard, Mouse and Monitor


Once you have everything in place you need to attach the cables for your mouse, keyboard and monitor. If you are using a video card make sure you attach your monitor cable to the correct VGA port.


Make sure to also connect the AC Cable to your power supply. Once the AC cable is connected check for a black switch on your power supply unit (PSU). This switch has a setting of one (1) or zero (0). One is “On” and Zero is “Off” so make sure this black switch is set to One “On”.

08. POST Testing Your Motherboard

To POST Test the motherboard we now need to turn the hardware on. To do this we will use a flat head screw driver to connect the power switch pins on the motherboard.
Refer to your motherboard manual for help in identifying these pins. These are commonly labeled red, black, or green but can vary depending on the motherboard. It is always best to refer to the manual to locate these pins.

Once you have located the two (2) pins for the power switch take your flathead screw driver and connect the two pins to power on the board.

When you tap them with the screw driver you should see your CPU fan start to spin. In a couple seconds you should hear a beep from your motherboard. One beep means the board has successfully POSTed.
(NOTE: Some motherboards do not have a speaker and may not beep.)
The main thing to look for is POST information on your monitor. Once you have POST Tested the motherboard you should see information displayed on your screen. If you see this information it is a sign that the computer has successfully completed the POST.

09. Completed POST Test


If you saw the information displayed on your screen you have successfully completed POST testing your board. You now know that all your basic hardware is functioning correctly and can proceed building your computer.

Saturday, June 9, 2012

Most common laptop hardware problems

In this post I will summarize most common laptop hardware related problems ever mentioned on this site.
I will not be digging into the operating system related problems, only laptop hardware issues.
I’ll provide most common laptop failure descriptions and give some suggestions how to troubleshoot or repair the problem.

Problem description: When you plug the AC adapter into the laptop, there are no lights turning on at all. When you push on the power button, nothing happens. The laptop appears to be completely dead, makes no sounds, no indications of life.

Possible problem:
- AC adapter failed and the battery discharged completely. First of all, test the AC adapter. If it’s dead, replace the adapter.
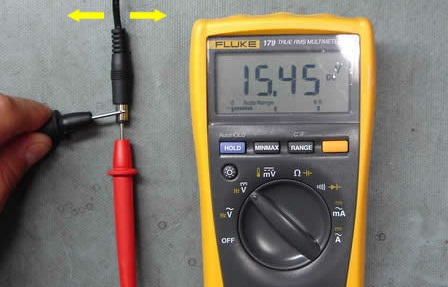
- DC jack separated from the motherboard (or DC jack broken) and the laptop doesn’t get any power from the AC adapter. In this case the DC jack has to be replaced.
- Laptop motherboard failed. If that’s the case, most likely the laptop not worth fixing.

Problem 2.
Laptop turns on but screen is blank.

Problem description: The laptop turns on, LED lights on the laptop turn on, cooling fan works but nothing appears on the screen. The screen is completely black and blank. There is no image on the screen at all, not even a very dim image.
Possible problem:
- This problem could be related to the memory failure. It’s possible one of the memory modules failed and the laptop doesn’t turn on because of that. In this case you can try reseating memory modules to make sure they are making good contact with the slot. You can try removing memory modules one by one and test the laptop with only one memory module installed. You can try replacing memory modules with new modules.
- If reseating/replacing memory modules doesn’t help, try removing the hard drive, DVD drive, modem, wireless card, keyboard, etc… In other words, disassemble the laptop to bare minimum and test again. If the laptop still doesn’t turn on, most likely you have failed motherboard or processor.

Problem 3.
Laptop turns on and off repeatedly.

Problem description:The laptop turn on without showing any image on the screen. After a few seconds the laptop turns off by itself. Then it turns on and off again. It continue turning on and off repeatedly until you power off the laptop completely.
Possible problem:
Most likely it happens because of some kind of motherboard failure. You can try reseating/replacing memory as I described in the Problem 2. If it doesn’t help, I would say this is motherboard related failure.
In most cases it’s not worth replacing the motherboard, better to buy a new laptop.


Problem 4.
Laptop makes noise while running.

Problem description:
The laptop turns on and everything works fine, except it makes some constant weird grinding or rattling noises. Some laptops make noises all the time, other laptops have them intermittently.
Possible problem:
In most cases this noise is coming from the cooling fan or laptop hard drive. You can turn on the laptop, wait until it starts making noise and after that listen closely on the bottom of the laptop. If the laptop starts making noise when the cooling fan starts running, most likely you have a failing fan. Replace the cooling fan.
If the laptop makes noise even when the fan not spinning, probably it’s coming from the hard drive. Back up all personal data from the hard drive as soon as possible, it can fail any moment. Replace the hard drive.
Here’s another technique to figure out if the noise coming from the fan or hard drive. Remove the hard drive from the laptop and stat the laptop. Wait until it warms up and the fan starts spinning. If the laptop still makes same noise even when the hard drive removed, most likely it’s bad fan.


Problem 5.
Laptop shuts down or freezes while in use.
Problem description:
The laptop turns on and runs properly but after a while it freezes or shuts down without any warning. When it happens, the laptop feels hot on the bottom. Also, the cooling fan works harder than usual.
Possible problem:
Most likely this is heat related issue. It happens because the cooling module gets clogged with dust and the laptop cannot “breath” properly. The laptop shuts down or freezes because the processor (CPU) overheats. Cleaning the cooling fan and heatsink should fix the problem.

Problem 6.
Laptop battery not charging properly.

Problem description:
The laptop battery stopped charging properly. It’s not charging at all or charges only after you adjust the position of AC adapter plug inside the power connector on the laptop.
Possible problem:
- Failed battery. If the battery stopped charging completely try reconnecting the battery first. If it doesn’t help, remove the battery and try running the laptop just from AC adapter. If the laptop runs fine from AC adapter but doesn’t charge the battery at all, most likely it’s either bad battery or motherboard problem. Try replacing the battery first.
- Loose DC power connector. If the battery charges only after you adjust the position of AC adapter tip inside the connector, this is DC jack related problem.

Problem 7.
Screen light doesn’t work or fails while the laptop running.

Problem description:
The laptop starts properly but after a while the screen light turns off. The image still appears on the screen but it’s very dark. In some cases the screen light never starts but you still can see a very faint image on the screen. In all cases the laptop video appears to be fine on the external monitor or TV.
Possible problem:
Most likely it’s either the screen inverter or screen backlight lamp (CCFL) failure. Both fail very similarly causing the screen light to go off. In order to trobuleshoot this kind of failure effectively, you’ll need some spare parts: either new working inverter or known good backlight lamp.

Problem 8.
Laptop has strange or garbled image on the screen.
Problem description:
The laptop turns on properly but shows bad, wrong or garbled image on the screen.
Possible problem:
- Graphics card failure. First of all, test your laptop with image output on the external monitor. If you see the same problem on the external screen, most likely this is graphics card related failure.
- If the problem appears only on the laptop screen, it could be related to one of the following: poor connection between the video cable and motherboard or LCD screen or failed video cable or failed LCD screen.

Problem 9.
Some laptop keyboard keys stopped working.

Problem description:
The laptop turns on and runs properly but some keyboard keys do not work at all or type wrong characters.
Possible problem:
Most likely this the keyboard failed. Laptop keyboards are not repairable. If some keys stopped working, you’ll have to replace the keyboard.

Problem 10.
Missing or broken keys on laptop keyboard.

Problem description:
A key got separated from the laptop keyboard.
Problem solution:
If a key got separated from the keyboard, it’s still possible to fix it without replacing the entire keyboard.
Hopefully you didn’t damage the key hinges.
If you have many keys missing, probably it makes sense to replace the whole keyboard.

Problem 11.
Laptop makes repetitive beep sound on startup.

Problem description:
You turn on the laptop but there is no video on the screen. Instead, the laptop makes repetitive beeping sound. You can “fix” the problem if you press on the keyboard keys.
Problem solution:
Most likely it happens because there is a stuck key on the keyboard. In this case you’ll have to replace the keyboard.

Problem 12.
Liquid spilled on laptop.

Problem description:
You spilled something on the laptop and it’s stopped working.
Problem solution:
Liquid spills are very dangerous and unpredictable. If it happened, turn off the laptop ASAP, remove the battery and do not use it until all internal parts are inspected for liquid damage.
It’s sill possible the laptop will work again after you clean the damage.

How to reinstall factory operating system on different laptops

In this post I explain how to reinstall factory operating system on different laptops. This should work for most laptops running Windows Vista or Windows 7 operating systems.

This could be useful if your operating system stopped working properly, got corrupted or infected with a virus.

WARNING! Running system restore utility will erase all personal data on the hard drive and re-image it back to factory defaults. Make sure all personal data is backed up before reinstalling the operating system. Also, make sure the laptop is running on AC adapter power during the recovery process.

These days most laptops are sold without recovery discs. Instead they have a hidden (or visible) recovery partition with the factory image. In order to re-image the hard drive back to factory defaults it’s necessary to initiate the recovery wizard and it’s very similar for many different laptop brands.

As an example I’ll show step-by-step operating system re-installation process on HP laptops.

Again, it will be the same or very similar for other laptop brands.

How to start Recovery Manager on HP laptops.

STEP 1.

Turn on the laptop and press the F8 key when HP (or any other brand) logo appears on the screen.

STEP 2.

On the next screen you should see Advanced Boot Options.
If for some reason you don’t get this screen, restart the laptop and press on the F8 key again.
From all available options select the very first line: Repair Your Computer and press on the Enter key.

STEP 3.
This should take you to the System Recovery Options.
Select available language and keyboard layout. Press on the next button.

STEP 4.
On the next screen select your user name (must be user with administrative rights) from the drop down menu.
Enter the user password and press the OK button.


STEP 5.
This will take you to the next System Recovery Options window.
The last option will be HP Recovery Manager. Click on it.

STEP 6.
This will take you to the next window: HP Recovery Manager.
There are many different options here and one of them – System Recovery (Restore your computer to its original factory conditions).
Select this option and follow the instructions on the screen.


How to start Recovery Wizard on Toshiba laptops.

In order to start Toshiba Recovery Wizard you follow STEPS 1-5.
This will bring you to the same System Recovery Options with Toshiba Recovery Wizard at the end.
Click on the Toshiba Recovery Wizard button.

On the next scree you’ll see Toshiba warning about data deletion. Click the next button.

In the next Toshiba Recovery Wizard window you can select Recover to out-of-box state option.
Click on the next button and follow instructions.

How to start Backup and Recovery Manager on Dell laptops.

Here’s another example. Now it’s for Dell laptops.
Again, follow steps 1-5 and on the System Recovery Options select the very last option: Dell Backup and Recovery Managers.
Share

Widgets